AMS Part 5: Programming Buttons and The New Activity
| [](http://supermekanismo.files.wordpress.com/2012/03/gameui.jpg) |
| A screen mockup. Lacking artistic touch. |
In this part of the tutorial, we'll create a simple structure for the actions on a button. We'll start an empty UI window that we'll later use for the game. This might be relatively short as it's pretty simple stuff. I still haven't setup code view so this will still be in print screen mode. (On the plus side, you get to write and understand everything right?)
| [](http://supermekanismo.files.wordpress.com/2012/03/currentcode1.png?w=300) |
| Our current code. |
Note: The sourcecode added was "glued-in" to the post to make it more convenient. The code posted in the notepad-looking extension was not tested. Double check with the image as it's the original one.
Tasks
Above we see our current code. The tasks for this tutorial would be to initialize the buttons, create listeners and start a new blank window. Let's start with initializing buttons.
Referencing Buttons
The great thing about building the UI from the XML is that we don't need to customize the look and feel anymore and using it in code is fairly simple. Instead of declaring a new button we just refer to it with Androids R. Android R allows you to access XML elements such as string values, drawable images, buttons among other things.
| [](http://supermekanismo.files.wordpress.com/2012/03/play_btn.png?w=300) |
| From the XML code view of the main UI. |
Repeat this step for the rest of your buttons and you should have something like the code below.
| [](http://supermekanismo.files.wordpress.com/2012/03/declarations.png?w=300) |
| HighScore and stats might be redundant but it's easy to take out later. |
Listeners
Now that we have our buttons present, it's time to go and make them do something. We need to declare some listeners to handle the buttons code. To do this we'll implement OnClickListener to our Activity. As with implementing, you have to do a couple of steps before being able to use it.
First, add the "implements OnClickListener" to your class. Next, Import android.view.View.OnClickListener. Lastly, create the method onClick (public void onClick(View arg0).
Your current code should now be something like the one below.
TODO code
Now, there are a lot of different ways to implement the TODO code. I happen to like the structure I'll show below since it's similar to the structure I used on my older java programs. This structure involves using the switch statement though unlike the action listener/action performed of Swing. How can switch be used when we're dealing with events? Switch can be used in this case because we'll use the getID method returns a particular integer value for each object. In a sense we'll just be checking which button is pressed with respect to it's ID/integer value. In each of the case, we'll put the TODO code for each button.
Make a switch statement and for the parameter
| [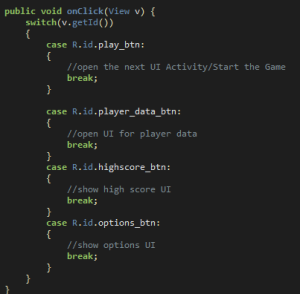](http://supermekanismo.files.wordpress.com/2012/03/switch.png?w=300) |
| Change the format/coding style to one you prefer. |
import android.app.Activity;
import android.content.Intent;
import android.os.Bundle;
import android.util.Log;
import android.view.View;
import android.view.View.OnClickListener;
public class AMS extends Activity implements OnClickListener{
private String TAG = "AMS";
@Override
public void onCreate(Bundle savedInstanceState) {
super.onCreate(savedInstanceState);
setContentView(R.layout.main);
Log.i(TAG, "The main activity has started");
View playButton = findViewById(R.id.play_btn);
playButton.setOnClickListener(this);
View statsButton = findViewById(R.id.player_data_btn);
statsButton.setOnClickListener(this);
View highscoreButton = findViewById(R.id.highscore_btn);
highscoreButton.setOnClickListener(this);
View optionsButton = findViewById(R.id.options_btn);
optionsButton.setOnClickListener(this);
}
public void onClick(View v) {
switch(v.getId())
{
case R.id.play_btn:
{
//open the next UI Activity/Start the Game
}
case R.id.player_data_btn:
{
//open UI for player data
break;
}
case R.id.highscore_btn:
{
//show high score UI
break;
}
case R.id.options_btn:
{
//show options UI
break;
}
}
}
}
[/sourcecode]
We're almost done. The last thing we'll tackle is opening a new window. It's not as simply as you might think because after we declare a new UI class we also need to declare it in the manifest.
First create a blank window. In the res/layout right click and select new Android XML file. Name it game. Let's create a new java class and name it Game.java.
The New Activity/UI Window
The Game java file is similar to our AMS/main java class. It's an activity too. We import Bundle, Activity, View and Log as well. We'll add a String TAG for easy debugging and also use our game.xml for the layout.
Also, add the log.i method to help us debug stuff later on. Again, this is almost the exact copy of what we started with in our main java class. The code for the Game.java is below.
Note: Code above is just the snippet. Insert it below the last activity tag in your manifest
To add our new activity, use the activity tag and place it after the last activity tag (of the main activity). There are a couple of properties you can add but I wanted to go full screen so the label property is actually not used and we won't add that in the new activity declaration. The name format as you notice is ".ClassName". We also set it to fullscreen for full awesomeness.
Opening the Window
Just a little more! Now that we have the new UI window setup and declared we'll add the code to open it but intent has to be explained.
Intent?
Intent is widely used in Android. A simple explanation would be that to open a new window, use another program or similar you would use an intent object. It is an object with information and a class (or action) attached. For a more detailed description the Google dev guide is here or if you prefer the documentation and a good tutorial is found here.
For this tutorial, let's use the intent to open the blank window we created. In your, switch statement for your button create a new intent. Intent i = new Intent(this, Game.class). Then add the method startActivity(i). (Don't forget to import! android.content.Intent).
It works!
Hopefully it does for you. You can download the code here.
Future Posts
This post also took longer than expected just because I had a hard time deciding on the layout and look of the Game interface. I might dive into a few topics like SQLite, running a thread, etc first before going to the building the UI again. I'll probably take a break too and finally finish a couple of articles on the gaming or tech industry that I wanted to talk about.